Friday, March 20, 2020
Again!!
Again we have to deal with a neighboring
tree branch coming down. Two weeks ago
we had high winds and another branch coming
down. After we sent them a letter that this is
coming down they only tie a rope on it. We
are taking bets how long this will stay this way.
Yes, again we had to contact the insurance
company as it's right over our fence. There
is no way we are going to take care of this.
Not our tree!!
Earlier this year we had another branch
come down from the east neighboring tree,
just missed the classic car. Needless to
say they weren't happy to find this large
limb in their yard. Why should we pay
to remove their junk?? Our yard debris
is full and they are not our trees.
3/23/2010
About mid morning there was a sound of
chainsaw!! Yep, finally they were going
to have the issue solved! Not!! They had
their tree service out and let's just say they
left a mess!! Come on folks, hire a tree arborist
to assess your trees not a cheap service!
The saga will continue as they are now top
heavy and trimmed upward to 25 to 30 feet
from the ground. They remove lots of dead
or broken branches but left some also. The limb
that had fallen was over 25 footer and I watched
them several times hit the fence. Not only that
but they were on the retaining wall and hands
on the fence to try to look over. Our fence is 6
foot so you know they couldn't see anything with
out climbing onto it.
No one let us know they were going to do work
until afterwards when someone came to the door
and requested to clean up our yard. Say what??
I have made a request and told all our neighbors
that no access to our yard during growing season!
He was lucky I didn't call the Sheriff as 'Our yard'
is clearly posted. I don't need some inexperienced
person walking all over our garden beds.
Limbs were dropped and several of the plants markers
were hit. I had a couple branches hit plants, what can
one say but they are careless again!!
The last photo is of the lowest branch that was
bent due to the branches that fell on it. It was
left and we are just speechless! Why leave this
lower branch that was damaged? But again
one needs to hire an arborist to make sure
that the tree is done correctly!
Thursday, February 27, 2020
Older Photos
B. Shorty's Variegated albino sport in
full bloom.
Datura Missouri Marble bloom.
Datura Missouri Marble full plant.
Datura Missouri Marble Albino
Terra Nova Nurseries' Reverse Variegated with first albino sport.
Terra Nova's Snowbank, our first plant. We have had
6 and currently have our 7th. We lost the others a few
years ago when our electric went out during the winter
months.
Our favorite photo of Datura Missouri Marble as it's
starts to open.
B. Shorty's Variegated one month after purchase.
B. Shorty's Variegated first flush.
B. Shorty's Variegated third flush.
B. Shorty's Variegated flush towards the end of the
flush.
Our west garden bed when we had the Brugmansias
in the ground. At that time we had 130 varieties. The
gental giant to the front right is our B. Hunter another
cross from B. Shorty's variegated.
Wednesday, February 26, 2020
Terra Nova's Reverse Variegated Sport 2020
I also posted the sport we are watching on the TNN's Reverse
variegated, which we have had since 2003. We are testing this
one and it's my understanding that TNN will not release this one.
variegated, which we have had since 2003. We are testing this
one and it's my understanding that TNN will not release this one.
Wednesday, January 29, 2020
Photos 2014/new greenhouse
https://photos.google.com/photo/AF1QipPmNExSKVQKC0F7SuxUulrIOaVwbC34dxXQmdTr
I had a request for photos of the newest greenhouse.
Thursday, January 2, 2020
Information For Those New To Brugmansias
I have been asked to help a few new folks get started with Brugmansia.
Cuttings:
https://www.pinterest.com/pin/683843524653941990/?lp=true
We have found this is the best way to start cuttings as you can watch them grow
and monitor the watering. You don't want to keep the cutting to wet or dry out
to much. Yes, you can start them in water. But word to the w ise, when the nubs
start, it's best to get them into soil for a better plant. We have found the smaller
plastic bottles work best as a cutting is small and will take off easier if not a lot
of soil. When one doesn't have space one will find ways to grow what one wants.
Each gardener is different so find the path that works for you.
Starting Seeds:
Brugmansia seeds need a 24 to 48 hours soaking period in warm water, unless they
are fresh seeds. Fresh seeds have a thinner coat and you can damage the seed inside.
The outside seed coat will turn harder when not fresh so soaking helps to remove the
outer coat. I tell folks to soak their seeds (karma's cocktail is on teaspoon of rubbing
alcohol per 12 ounce of warm water) which really helps this process. We place the
containers of water up on the refrigerator where it's warmer. If you soak over 24 hours
you may want to change the water if it gets cloudy.
If you plant fresh seeds direct you will risk damage to the plant if the outer coat get stuck on the
plant and you have to cut it away. Plant the seeds in small starter pots to start or
small starter cells if starting in flats. You don't want large pots where they are lost in
the dirt. Once you get the hang of planting seeds and they grow them, you can try
different methods. I know some folks will put seeds on damp paper towels in plastic
bags to start but the sooner you can get them into soil, the better off the plant will be.
We here plant the seeds about 1/4 inch deep into the soil. Lightly water and set in a
warm sunny spot.
You can also use the bottle method above to start your seeds in.
We have a post on what was harvested last year in the lines of seeds, November 18, 2019.
I do have several Brugmansia seeds from 2018 that are mixed in what we grow.
Datura seeds also should be soaked in the same manner but there is no hard coat to peal off.
Current seed listing on these was posted Oct.4, 2018. Datura seeds have a 30 year shelf life
plus some need to have a cool chill before starting. They require at least temps in the 70s and
full sunshine! Min fertilizing if planted in the ground with good soil. Added to the list 3 seedpods of D. metal var fastuosa from last year's single plant. 3/1/2020 all our Brugmansia seeds are not planted and coming up! If you would like a seedling let me know.
You can go back to some of our older posts also to read about this method. June 19, 2019
Cuttings:
https://www.pinterest.com/pin/683843524653941990/?lp=true
We have found this is the best way to start cuttings as you can watch them grow
and monitor the watering. You don't want to keep the cutting to wet or dry out
to much. Yes, you can start them in water. But word to the w ise, when the nubs
start, it's best to get them into soil for a better plant. We have found the smaller
plastic bottles work best as a cutting is small and will take off easier if not a lot
of soil. When one doesn't have space one will find ways to grow what one wants.
Each gardener is different so find the path that works for you.
Starting Seeds:
Brugmansia seeds need a 24 to 48 hours soaking period in warm water, unless they
are fresh seeds. Fresh seeds have a thinner coat and you can damage the seed inside.
The outside seed coat will turn harder when not fresh so soaking helps to remove the
outer coat. I tell folks to soak their seeds (karma's cocktail is on teaspoon of rubbing
alcohol per 12 ounce of warm water) which really helps this process. We place the
containers of water up on the refrigerator where it's warmer. If you soak over 24 hours
you may want to change the water if it gets cloudy.
If you plant fresh seeds direct you will risk damage to the plant if the outer coat get stuck on the
plant and you have to cut it away. Plant the seeds in small starter pots to start or
small starter cells if starting in flats. You don't want large pots where they are lost in
the dirt. Once you get the hang of planting seeds and they grow them, you can try
different methods. I know some folks will put seeds on damp paper towels in plastic
bags to start but the sooner you can get them into soil, the better off the plant will be.
We here plant the seeds about 1/4 inch deep into the soil. Lightly water and set in a
warm sunny spot.
You can also use the bottle method above to start your seeds in.
We have a post on what was harvested last year in the lines of seeds, November 18, 2019.
I do have several Brugmansia seeds from 2018 that are mixed in what we grow.
Datura seeds also should be soaked in the same manner but there is no hard coat to peal off.
Current seed listing on these was posted Oct.4, 2018. Datura seeds have a 30 year shelf life
plus some need to have a cool chill before starting. They require at least temps in the 70s and
full sunshine! Min fertilizing if planted in the ground with good soil. Added to the list 3 seedpods of D. metal var fastuosa from last year's single plant. 3/1/2020 all our Brugmansia seeds are not planted and coming up! If you would like a seedling let me know.
You can go back to some of our older posts also to read about this method. June 19, 2019
Monday, September 23, 2019
Brugmansia
Brugmansia and Datura
Angel's Trumpets and Thorn Apples
By Ulrike and Hans Georg Preissel
Is the best reference book!! There are groups out there to join if you think you want to.
There is information online at these groups and one should know the top growers if one
really wants to grow these. I don't do the political things when it comes to plants. Yes,
I have joined some of these groups but feel it's not for me. Each gardener is different and
one needs to find what works for you.
Be forewarned these are toxic!! Respect them and you will be safe. They can cause death!!
I have been asked this past week to do a step by step detail of growing Brugmansias
as some folks are needing some advice. We have covered a lot of what we do here
in the past posts and hope folks will take some time to read old posts. We do not have a degree in hort and do things that are frowned upon by some, but they work!! So as time permits after
I get the plants put away I'll try to do a month by month what we do here to help new
growers.
Right now one shouldn't be fertilizing and allowing the plants to get ready for a restful winter!!
Sept 1 to Sept. 15 is cut off time for fertilizing. Oct. 1 to 15th is time to bring them in.
More to come...........
Angel's Trumpets and Thorn Apples
By Ulrike and Hans Georg Preissel
Is the best reference book!! There are groups out there to join if you think you want to.
There is information online at these groups and one should know the top growers if one
really wants to grow these. I don't do the political things when it comes to plants. Yes,
I have joined some of these groups but feel it's not for me. Each gardener is different and
one needs to find what works for you.
Be forewarned these are toxic!! Respect them and you will be safe. They can cause death!!
I have been asked this past week to do a step by step detail of growing Brugmansias
as some folks are needing some advice. We have covered a lot of what we do here
in the past posts and hope folks will take some time to read old posts. We do not have a degree in hort and do things that are frowned upon by some, but they work!! So as time permits after
I get the plants put away I'll try to do a month by month what we do here to help new
growers.
Right now one shouldn't be fertilizing and allowing the plants to get ready for a restful winter!!
Sept 1 to Sept. 15 is cut off time for fertilizing. Oct. 1 to 15th is time to bring them in.
More to come...........
Monday, September 2, 2019
Brugmansia House Makeover!!
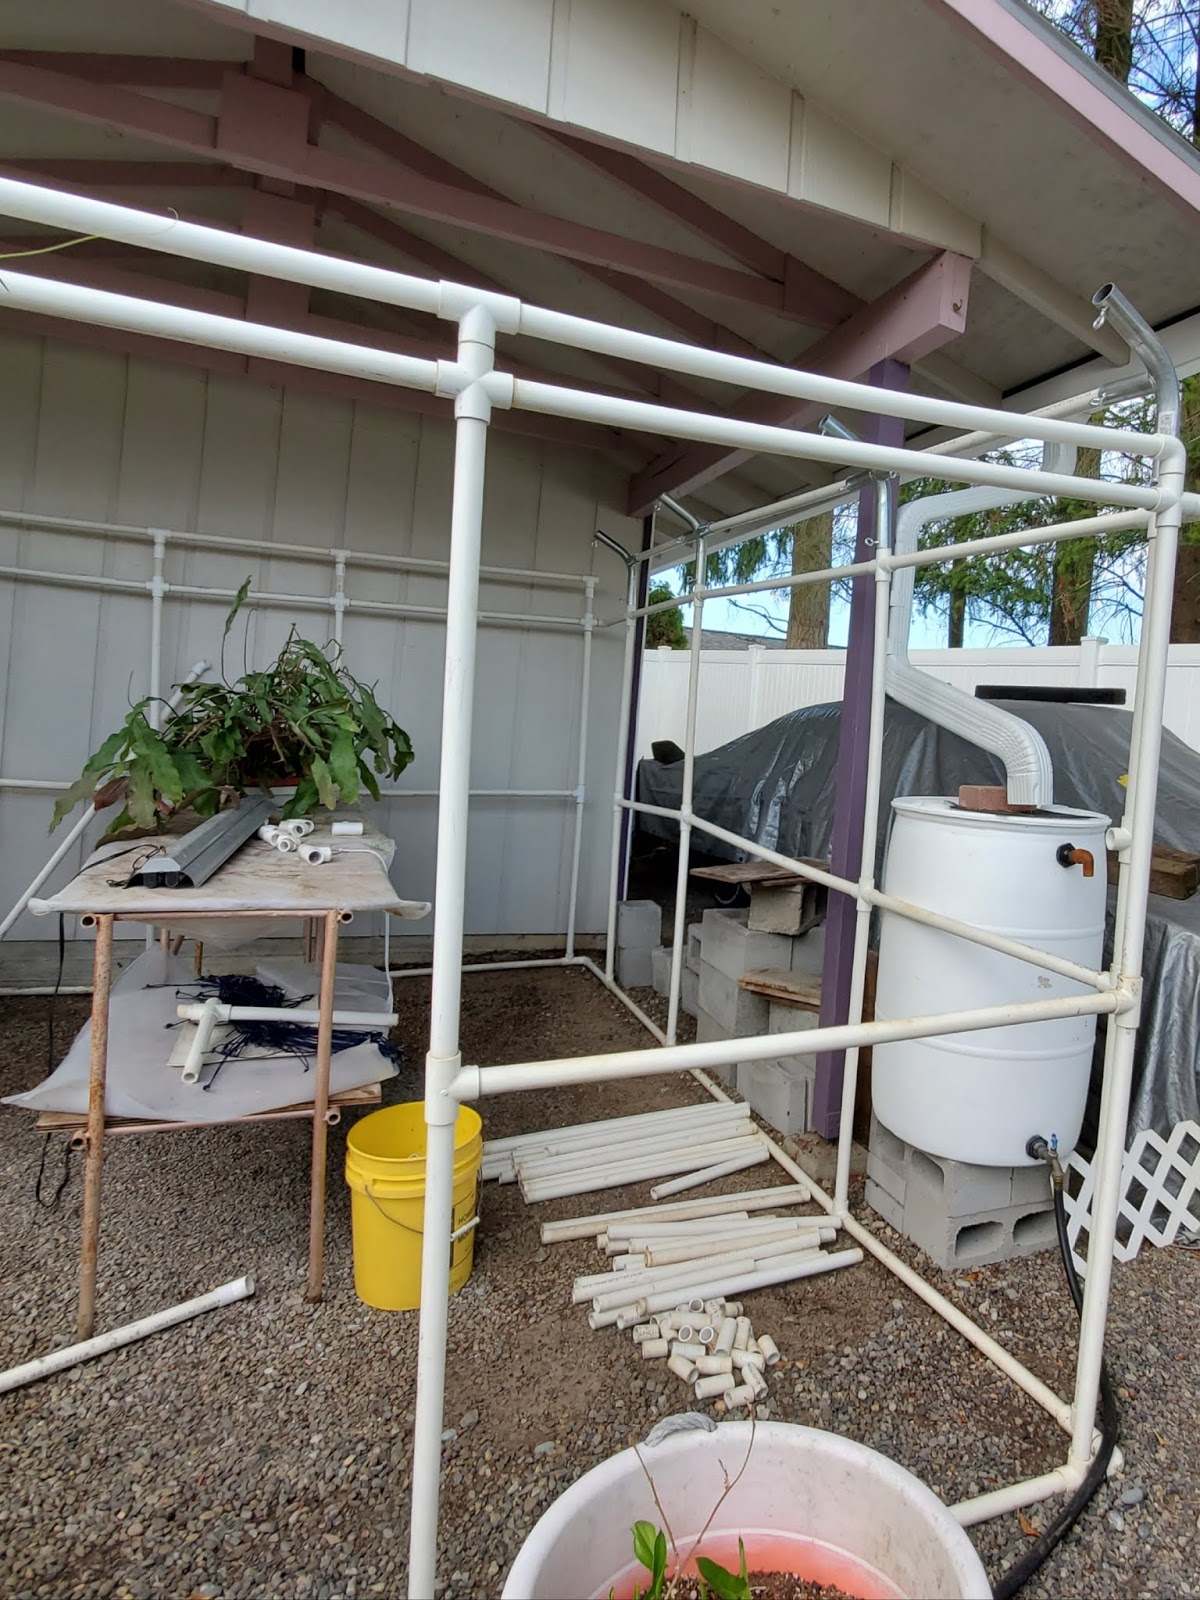
Last winter I noticed that the PCV connectors that were glued were starting
to crack so I knew this summer I would need to redo some of the house before
putting the Brugs away for the winter months. So a few weeks ago we unloaded
the plants that were still inside and found them safe places.
All the eppie cactus had to come down and put in an area that wouldn't get
much sun or they would fry. Not a safe place but it had to do for a while.
While the back roof was off it was time to decide if a foot could be added to
the frame and to remove the area that was cracked and broken. I also broke down
the shelf made from PVC just in case I needed the room.
Earlier this spring I had found a company that did carport connectors in metal so I
thought these would work great for our use. These were ordered and arrived so I sprayed
them with a clear coat of paint to prevent rusting.
I laid out the cut PVC so I knew what was available and went to putting the pipe
in place one section at a time. After repairing the back corners and adding a new section
of pipe to the NE corner I could see this was going to be fun!!
East section done and the new metal connectors in place! Time
to work on the west side, add a foot and put in the metal connectors.
Next was the roof and figuring out the how to add the support to
the east side instead of adding it after the fact. The metal connectors
would make the roof to high so I went back to the PVC connectors.
Here is a close up of the metal connector so you can see it. With is we
just added a goo 9 inches in height to the sides.
With the frame completed it was time to rehang all the eppies for the
next few weeks. In a few weeks it will be time to cover it all in plastic
for the winter months.
After taping the top I then hang the hanging eppie baskets to the top pipe to hold the plastic in place. After enlarging the house to a 11 X 12 foot size, I hope to get all the plants in there this year. The greenhouse is almost full now. I really need another kit greenhouse so hopefully that can be done before I have to change plastic again.
Hopefully on Monday I can get the top on.
to crack so I knew this summer I would need to redo some of the house before
putting the Brugs away for the winter months. So a few weeks ago we unloaded
the plants that were still inside and found them safe places.
All the eppie cactus had to come down and put in an area that wouldn't get
much sun or they would fry. Not a safe place but it had to do for a while.
While the back roof was off it was time to decide if a foot could be added to
the frame and to remove the area that was cracked and broken. I also broke down
the shelf made from PVC just in case I needed the room.
Earlier this spring I had found a company that did carport connectors in metal so I
thought these would work great for our use. These were ordered and arrived so I sprayed
them with a clear coat of paint to prevent rusting.
I laid out the cut PVC so I knew what was available and went to putting the pipe
in place one section at a time. After repairing the back corners and adding a new section
of pipe to the NE corner I could see this was going to be fun!!
East section done and the new metal connectors in place! Time
to work on the west side, add a foot and put in the metal connectors.
Next was the roof and figuring out the how to add the support to
the east side instead of adding it after the fact. The metal connectors
would make the roof to high so I went back to the PVC connectors.
Here is a close up of the metal connector so you can see it. With is we
just added a goo 9 inches in height to the sides.
With the frame completed it was time to rehang all the eppies for the
next few weeks. In a few weeks it will be time to cover it all in plastic
for the winter months.
September 21
We put the bottom plastic up and boy was that fun!!
One large piece to wrap all around and you have to unfold while doing so. Then tape the top to the top pipe with the folding of the bottom up under the lower pipe.After taping the top I then hang the hanging eppie baskets to the top pipe to hold the plastic in place. After enlarging the house to a 11 X 12 foot size, I hope to get all the plants in there this year. The greenhouse is almost full now. I really need another kit greenhouse so hopefully that can be done before I have to change plastic again.
Hopefully on Monday I can get the top on.
Sunday it rained so we had a rain delay, which was nice as I had a garden tour with a few nice
gardening folks. We hope to have the gardens all cut back by the 1st of Oct. so we can deal with what drops of blows in from neighboring trees. Our gardens close for the season on the 1st also.
Subscribe to:
Posts (Atom)