https://photos.google.com/photo/AF1QipPmNExSKVQKC0F7SuxUulrIOaVwbC34dxXQmdTr
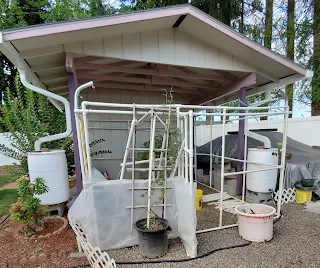
I had a request for photos of the newest greenhouse.
Wednesday, January 29, 2020

Thursday, January 2, 2020
Information For Those New To Brugmansias
I have been asked to help a few new folks get started with Brugmansia.
Cuttings:
https://www.pinterest.com/pin/683843524653941990/?lp=true
We have found this is the best way to start cuttings as you can watch them grow
and monitor the watering. You don't want to keep the cutting to wet or dry out
to much. Yes, you can start them in water. But word to the w ise, when the nubs
start, it's best to get them into soil for a better plant. We have found the smaller
plastic bottles work best as a cutting is small and will take off easier if not a lot
of soil. When one doesn't have space one will find ways to grow what one wants.
Each gardener is different so find the path that works for you.
Starting Seeds:
Brugmansia seeds need a 24 to 48 hours soaking period in warm water, unless they
are fresh seeds. Fresh seeds have a thinner coat and you can damage the seed inside.
The outside seed coat will turn harder when not fresh so soaking helps to remove the
outer coat. I tell folks to soak their seeds (karma's cocktail is on teaspoon of rubbing
alcohol per 12 ounce of warm water) which really helps this process. We place the
containers of water up on the refrigerator where it's warmer. If you soak over 24 hours
you may want to change the water if it gets cloudy.
If you plant fresh seeds direct you will risk damage to the plant if the outer coat get stuck on the
plant and you have to cut it away. Plant the seeds in small starter pots to start or
small starter cells if starting in flats. You don't want large pots where they are lost in
the dirt. Once you get the hang of planting seeds and they grow them, you can try
different methods. I know some folks will put seeds on damp paper towels in plastic
bags to start but the sooner you can get them into soil, the better off the plant will be.
We here plant the seeds about 1/4 inch deep into the soil. Lightly water and set in a
warm sunny spot.
You can also use the bottle method above to start your seeds in.
We have a post on what was harvested last year in the lines of seeds, November 18, 2019.
I do have several Brugmansia seeds from 2018 that are mixed in what we grow.
Datura seeds also should be soaked in the same manner but there is no hard coat to peal off.
Current seed listing on these was posted Oct.4, 2018. Datura seeds have a 30 year shelf life
plus some need to have a cool chill before starting. They require at least temps in the 70s and
full sunshine! Min fertilizing if planted in the ground with good soil. Added to the list 3 seedpods of D. metal var fastuosa from last year's single plant. 3/1/2020 all our Brugmansia seeds are not planted and coming up! If you would like a seedling let me know.
You can go back to some of our older posts also to read about this method. June 19, 2019
Cuttings:
https://www.pinterest.com/pin/683843524653941990/?lp=true
We have found this is the best way to start cuttings as you can watch them grow
and monitor the watering. You don't want to keep the cutting to wet or dry out
to much. Yes, you can start them in water. But word to the w ise, when the nubs
start, it's best to get them into soil for a better plant. We have found the smaller
plastic bottles work best as a cutting is small and will take off easier if not a lot
of soil. When one doesn't have space one will find ways to grow what one wants.
Each gardener is different so find the path that works for you.
Starting Seeds:
Brugmansia seeds need a 24 to 48 hours soaking period in warm water, unless they
are fresh seeds. Fresh seeds have a thinner coat and you can damage the seed inside.
The outside seed coat will turn harder when not fresh so soaking helps to remove the
outer coat. I tell folks to soak their seeds (karma's cocktail is on teaspoon of rubbing
alcohol per 12 ounce of warm water) which really helps this process. We place the
containers of water up on the refrigerator where it's warmer. If you soak over 24 hours
you may want to change the water if it gets cloudy.
If you plant fresh seeds direct you will risk damage to the plant if the outer coat get stuck on the
plant and you have to cut it away. Plant the seeds in small starter pots to start or
small starter cells if starting in flats. You don't want large pots where they are lost in
the dirt. Once you get the hang of planting seeds and they grow them, you can try
different methods. I know some folks will put seeds on damp paper towels in plastic
bags to start but the sooner you can get them into soil, the better off the plant will be.
We here plant the seeds about 1/4 inch deep into the soil. Lightly water and set in a
warm sunny spot.
You can also use the bottle method above to start your seeds in.
We have a post on what was harvested last year in the lines of seeds, November 18, 2019.
I do have several Brugmansia seeds from 2018 that are mixed in what we grow.
Datura seeds also should be soaked in the same manner but there is no hard coat to peal off.
Current seed listing on these was posted Oct.4, 2018. Datura seeds have a 30 year shelf life
plus some need to have a cool chill before starting. They require at least temps in the 70s and
full sunshine! Min fertilizing if planted in the ground with good soil. Added to the list 3 seedpods of D. metal var fastuosa from last year's single plant. 3/1/2020 all our Brugmansia seeds are not planted and coming up! If you would like a seedling let me know.
You can go back to some of our older posts also to read about this method. June 19, 2019
Monday, September 23, 2019
Brugmansia
Brugmansia and Datura
Angel's Trumpets and Thorn Apples
By Ulrike and Hans Georg Preissel
Is the best reference book!! There are groups out there to join if you think you want to.
There is information online at these groups and one should know the top growers if one
really wants to grow these. I don't do the political things when it comes to plants. Yes,
I have joined some of these groups but feel it's not for me. Each gardener is different and
one needs to find what works for you.
Be forewarned these are toxic!! Respect them and you will be safe. They can cause death!!
I have been asked this past week to do a step by step detail of growing Brugmansias
as some folks are needing some advice. We have covered a lot of what we do here
in the past posts and hope folks will take some time to read old posts. We do not have a degree in hort and do things that are frowned upon by some, but they work!! So as time permits after
I get the plants put away I'll try to do a month by month what we do here to help new
growers.
Right now one shouldn't be fertilizing and allowing the plants to get ready for a restful winter!!
Sept 1 to Sept. 15 is cut off time for fertilizing. Oct. 1 to 15th is time to bring them in.
More to come...........
Angel's Trumpets and Thorn Apples
By Ulrike and Hans Georg Preissel
Is the best reference book!! There are groups out there to join if you think you want to.
There is information online at these groups and one should know the top growers if one
really wants to grow these. I don't do the political things when it comes to plants. Yes,
I have joined some of these groups but feel it's not for me. Each gardener is different and
one needs to find what works for you.
Be forewarned these are toxic!! Respect them and you will be safe. They can cause death!!
I have been asked this past week to do a step by step detail of growing Brugmansias
as some folks are needing some advice. We have covered a lot of what we do here
in the past posts and hope folks will take some time to read old posts. We do not have a degree in hort and do things that are frowned upon by some, but they work!! So as time permits after
I get the plants put away I'll try to do a month by month what we do here to help new
growers.
Right now one shouldn't be fertilizing and allowing the plants to get ready for a restful winter!!
Sept 1 to Sept. 15 is cut off time for fertilizing. Oct. 1 to 15th is time to bring them in.
More to come...........
Monday, September 2, 2019
Brugmansia House Makeover!!
Last winter I noticed that the PCV connectors that were glued were starting
to crack so I knew this summer I would need to redo some of the house before
putting the Brugs away for the winter months. So a few weeks ago we unloaded
the plants that were still inside and found them safe places.


All the eppie cactus had to come down and put in an area that wouldn't get
much sun or they would fry. Not a safe place but it had to do for a while.

While the back roof was off it was time to decide if a foot could be added to
the frame and to remove the area that was cracked and broken. I also broke down
the shelf made from PVC just in case I needed the room.
Earlier this spring I had found a company that did carport connectors in metal so I
thought these would work great for our use. These were ordered and arrived so I sprayed
them with a clear coat of paint to prevent rusting.

I laid out the cut PVC so I knew what was available and went to putting the pipe
in place one section at a time. After repairing the back corners and adding a new section
of pipe to the NE corner I could see this was going to be fun!!
East section done and the new metal connectors in place! Time
to work on the west side, add a foot and put in the metal connectors.

Next was the roof and figuring out the how to add the support to
the east side instead of adding it after the fact. The metal connectors
would make the roof to high so I went back to the PVC connectors.
Here is a close up of the metal connector so you can see it. With is we
just added a goo 9 inches in height to the sides.

With the frame completed it was time to rehang all the eppies for the
next few weeks. In a few weeks it will be time to cover it all in plastic
for the winter months.

 One large piece to wrap all around and you have to unfold while doing so. Then tape the top to the top pipe with the folding of the bottom up under the lower pipe.
 After taping the top I then hang the hanging eppie baskets to the top pipe to hold the plastic in place. After enlarging the house to a 11 X 12 foot size, I hope to get all the plants in there this year. The greenhouse is almost full now. I really need another kit greenhouse so hopefully that can be done before I have to change plastic again.
Hopefully on Monday I can get the top on.
to crack so I knew this summer I would need to redo some of the house before
putting the Brugs away for the winter months. So a few weeks ago we unloaded
the plants that were still inside and found them safe places.


All the eppie cactus had to come down and put in an area that wouldn't get
much sun or they would fry. Not a safe place but it had to do for a while.

While the back roof was off it was time to decide if a foot could be added to
the frame and to remove the area that was cracked and broken. I also broke down
the shelf made from PVC just in case I needed the room.
Earlier this spring I had found a company that did carport connectors in metal so I
thought these would work great for our use. These were ordered and arrived so I sprayed
them with a clear coat of paint to prevent rusting.

I laid out the cut PVC so I knew what was available and went to putting the pipe
in place one section at a time. After repairing the back corners and adding a new section
of pipe to the NE corner I could see this was going to be fun!!
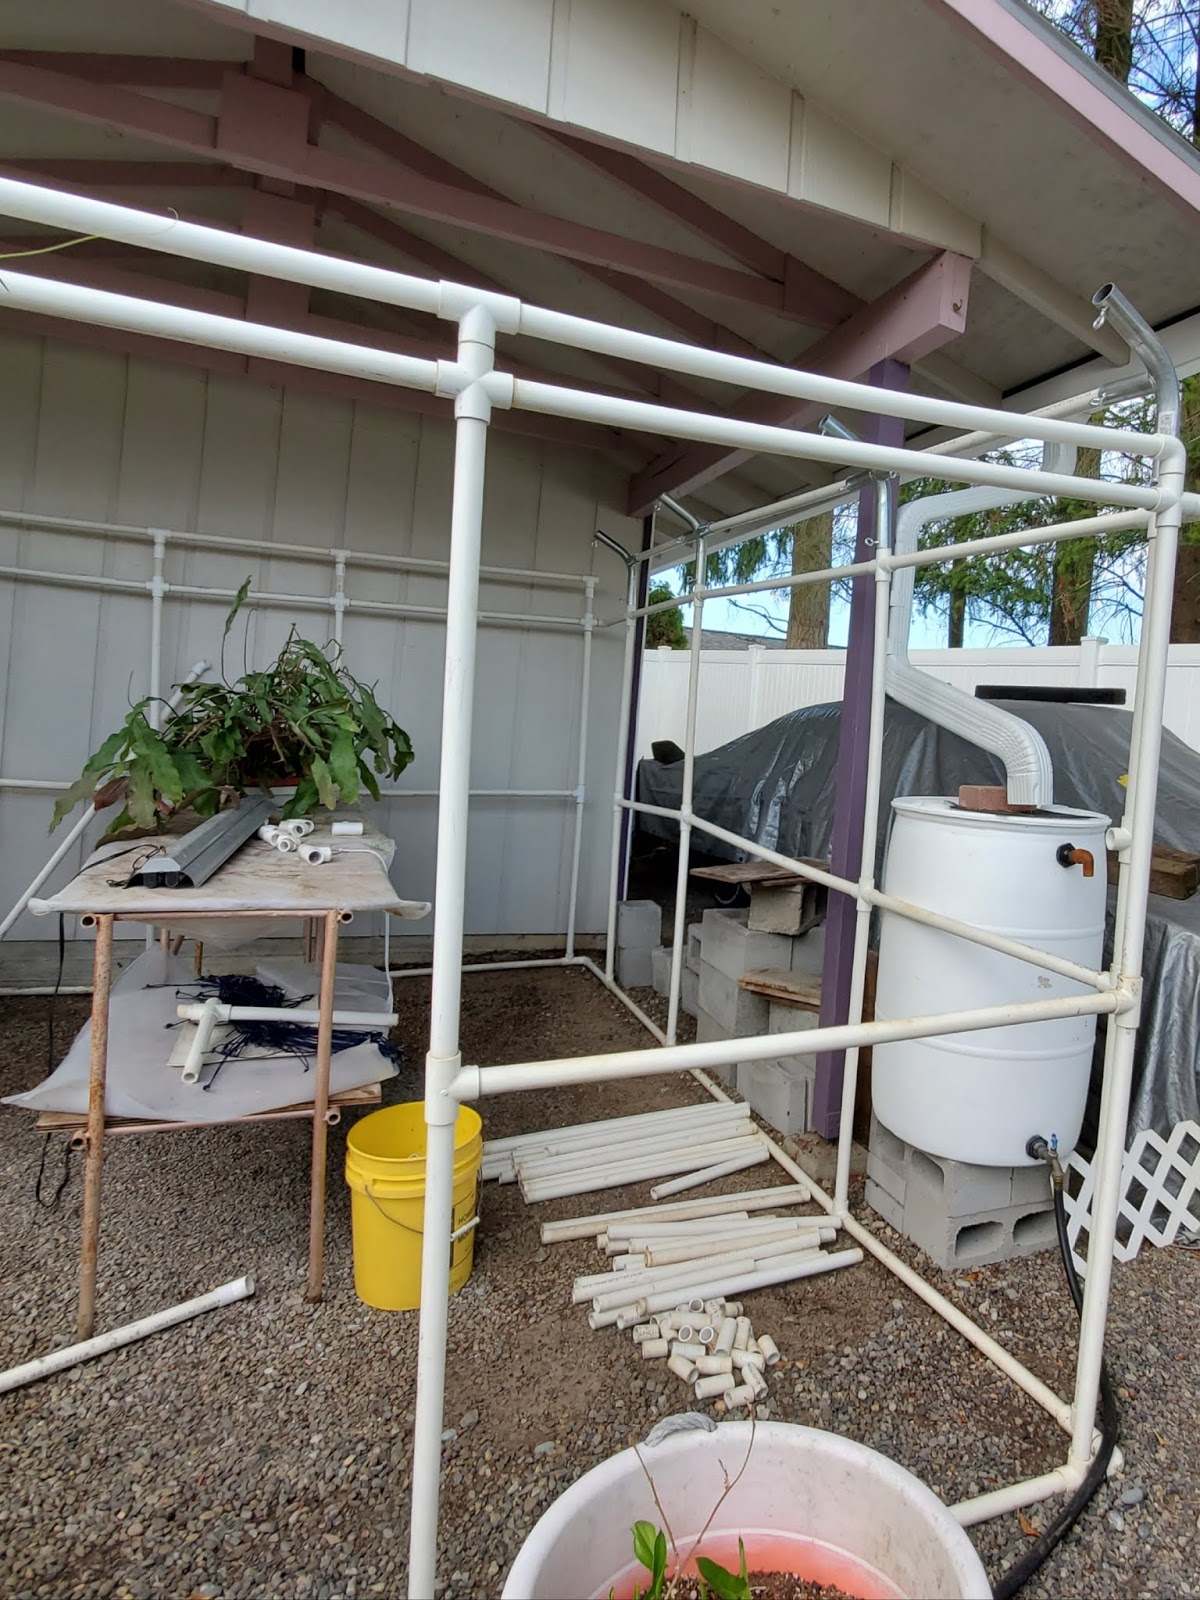
East section done and the new metal connectors in place! Time
to work on the west side, add a foot and put in the metal connectors.


Next was the roof and figuring out the how to add the support to
the east side instead of adding it after the fact. The metal connectors
would make the roof to high so I went back to the PVC connectors.
Here is a close up of the metal connector so you can see it. With is we
just added a goo 9 inches in height to the sides.

With the frame completed it was time to rehang all the eppies for the
next few weeks. In a few weeks it will be time to cover it all in plastic
for the winter months.

September 21
We put the bottom plastic up and boy was that fun!!


Hopefully on Monday I can get the top on.
Sunday it rained so we had a rain delay, which was nice as I had a garden tour with a few nice
gardening folks. We hope to have the gardens all cut back by the 1st of Oct. so we can deal with what drops of blows in from neighboring trees. Our gardens close for the season on the 1st also.
Sunday, May 14, 2017
January 2017

January came in with a huge storm and the 5th coldest month on record! For a week we watch our
neighbor's trees drop limbs and again we have fence damage. The above photo was taken after the 14+ inches of snow melted and we could get back to see the damage. There is no way we could clean this up so I started by calling our fence guys, they are now listed with Home Advisors. I got them out and sure enough one pole took a big hit and it tweaked the fence to the south when it took the hit. So we are looking at replacement of one and resetting of three or four more. This is the second time our fence has had to be repaired. Two years ago it was taken out in about the same area. At that time we sent out letters in a neighborly manner to all the adjacent neighbors that had trees on our fence line as they are a huge problem. After getting the fence guys out I got a phone call from HA asking about the fence guys and the estimate. I got talking to the gal and asked if they had pros that would give us an estimate for limb removal. Shocked when the phone started ringing right away. I wanted estimates for removal and possible limbing up, mind you I need to get permission first to do so. Not our trees but they hang into our yard some 40 to 50 feet. Mid spring I had the neighbor at my door and telling me tree trimmers will be out a certain day, I thought okay but concerned as the plants were up and growing. After watching them drop limbs in the yard it was time to go out and tell them to stop dropping them in our yard. I went out and started tossing them back across the fence. They were out to sail up the trees, but only did it on the west side. They didn't care!! As I watched them
drop all over the place, no tying of limbs and lowering them safely to the ground. I asked what company they were with, mental note not to hire them!! They did nothing to our side and after our
growing season my husband and I decided to remove what we could as the limbs were all the way to our roof. Hence the cleaning off the roof before any rain hit. A job that needs to be done monthly due to all that comes out of the trees. Also our small maple in the back yard was touching the huge branches. Time for a trim and we knew to cut the limbs so they would spring upward. In the middle of the job we found broken branches and they drooped down to the fence area so we noted the area
and keep a watch on the branches, the same branches that came done in the storm. Again not our trees and after taking two truck loads out at our expense we had enough. We take two loads of stuff off our yard yearly just from these trees besides our every other week yard debris which is full of stuff from neighboring trees.
After the first storm and filing a claim with the insurance company, the adjuster made the statement if the winds kick up, I should grab our dog and leave!! If you don't know fir trees they have shallow roots and will topple over in the wind out here. Beings that these are planted close together, you got it if one comes down they all may come with it!! These trees are to the west of us and yearly we have a mess with the stuff dropping out of the trees! After a few years of fighting to keep grass growing we removed the grass and put in our flower beds as there was no way grass would grow. We currently have a beautiful hosta garden that will grow in the shade.
Making this long story short, we sent out letters to all our neighbors that had trees planted on the property line and they hang over the fence line. We did so by certified mail according to what we learned from our visit with our insurance company. We also changed our policy to an umbrella policy. We are just trying to protect our property! In the letter we made just a few requests, that if work is going to be done, it's not during the growing season. That all requests be put in writing and we ask who is doing the work, there would be minimal access to our yard and I would do the clean up, my going rate is $20 an hour. I will not allow work when it's raining as our yard will not tolerate a lot of foot
traffic and beings that we are located in a tributary area we see our soil become really soggy.
The end of April our neighbor to the west showed up at our door one evening to inform us that the next day he was going to have a couple trees removed! Nothing was done in writing, nor did we get
very much notice to protect our property from the mess of taking these 80 fir trees down. This photo was taken after the clean up from February's high wind and storm before the hostas started to grow.

The day they started trimming it was raining and wind so you know where the fir chips fell. We had chips fly all over the yard, across the roof and even falling in our front yard. Needless to say we weren't happy and watch it all happen, I video taped 90% of the day's events. I was shocked the first hour they just cut and allowed it to drop. I even watched as they started lowing the branches when they noticed I was watching them by rope and watched as they hit the fence a few times. One of the post was hit hard enough it moved forward. Needless to say when the neighbor showed up at our door to ask if they could clean up, all I could do is shut my front door. The yard was wet and knowing the company that was hired they would just pick up the large limbs that dropped. I was not going to allow them to walk all over our yard. Plus what did the letter say? I then contacted an attorney we had hired in the past. We went over to talk to them and told them I would clean up the yard and my going rate was $20 to do so. I would send them the bill for that and the fixing of the fence as we were tired of paying for what their trees damaged. They kept telling us they were trying to be good neighbors. When we left they stated that they were going to talk to their attorney, so be it.
We are in the process of getting the fence folks to come out and fix the fence now that I have spent 10 1/2 hours doing the clean up.


Saturday, March 14, 2015


Subscribe to:
Posts (Atom)